Monday, January 31, 2011

Nursery Take Down!

What an exciting weekend! We were able to get into the nursery and get some things done and it felt GREAT! The walls went from orange to white (primer) to Celery Sprig (a.k.a. muted lime green) and the ceiling went from white to Caruso (a.k.a. muted turquoise). These are pretty bad pictures because the colors are no where near this bright, but you get an idea of our progress!

Zero VOC primer and paint...of course!

Choices for wall colors: Lemon Grass or Celery Sprig (we went with the latter)

Caruso for the ceiling and closet...you have to see this in person to truly appreciate it.

Chris getting after that ceiling. (Trust me...the colors are NOT this bright in person!)

After the first coat (I have to say it again...the colors are NOT this bright. It seems really scary looking at the pictures but in person it is quite sassy!)

We finished the second coat yesterday and are going to work on the trim this week. I HATE painting trim but will power through it! I'll take better pictures with an actual camera after that project so you can get a better idea of the colors. After that is complete, my favorite part is next...furniture re-do! Love turning trash into treasure!

Thursday, January 27, 2011

Pamperin' those toes!

Detoxing beauty products can be challenging...espcially when you have become attached to a certain color. I had no issue getting rid of my products that cleanse, even finiding new make-up wasn't too bad...but finding nail polish that was non-toxic, not an arm and a leg expensive and was attractive was proving difficult. Having a bun in the oven finally pushed me to take the plunge and I purchased non-toxic polish and remover.

Let's start with the soy polish remover. I found it on Gaiam and even though it was $28 (gasp)...I'm sold! Not only did this product do it's job but my nail beds never felt better. It actually moisturizers as it removes...brilliant! The remover is naturally derived from corn and soy, plus it is free of carcinogens and petroleum.  To top it off, it is 100% biodegradable! That moisturizing feeling that I'm now obsessed with is from organge oil, which encoruages healthy nail growth while it nourishes the nail bed. Thankfully, a little goes a long way so it will be a little while before I'll have to purchase again.


This nail polish is just as fabulous as its toxic counterparts! I like to keep my nails a little more neutral so I didn't mind the slim color choices at Gaiam. My only issue with it was the price...$16...a bit pricy for polish. But great news...it is free of all carcingogens!

Although these products aren't exactly wallet-friendly...it is nice to splurge every once and awhile on products that are healthy for me and the little one growing! Even though I don't see my toes as often as I did...it's nice to know (or think) they look good!

Sunday, January 23, 2011

Bye Bye Popcorn!

One of the most intimidating tasks to prep the nursery was saying goodbye to the popcorn ceiling. It seemed like such a messy, tedious job that I was really dreading it...but it was so stinkin' simple. Before I knew Chris started the project, he was done.  I was so impressed!

If this is something you are thinking about for your home, follow these simple steps:

Remove all furniture from the room. If you have carpet, place a tarp (or something similar) from wall to wall. Although easy, this is a messy, messy project! Spray water over the area you wish to remove and then proceed to scrape....that's it! For safety purposes, Chris wore a pair of goggles.


Literally, this project took 30 minutes to complete. All the popcorn in the nursery is gone...next step...PAINT!

Wednesday, January 19, 2011

Beaba Babycook Baby Food Maker

Our first "real" purchase to prepare for Baby Girl Henry was the Beaba Babycook Baby Food Maker. I knew from the first time I stumbled across this little gem in my Williams-Sonoma magazine that this was the gadget for me! I know, she isn't even here yet and I'm already purchasing things that she won't need for a few months after arrival...but I wanted it.

Making our own baby food didn't even get a second thought from me...I have always known we would do it. I love the idea of knowing (ok..controlling) exactly what products go into our little bundle of joy. To add to my motivation, nothing frightens me more than raising a picky eater so I want to make sure to expose her to as many yummy fruits and vegetables as early as possible!

I'm also realistic...both Chris and I will be back to work and experiencing one of our busiest times of year when the little one is ready for solid foods (UGH...THE FALL!)...that is where the Babycook comes into play!

This little gadget is a steamer, blender, warmer and defroster in one appliance. Meaning...we can steam vegetables and fruits (and meat or fish if we were interested...which we aren't), then we can puree or blend it, then we can put it in their adorable food trays and when we are ready to feed her, we can defrost and reheat it...all in one machine! Plus...the bowl and basket are dishwasher safe and BPA free.

Speaking of their adorable food trays....they are BPA -free silicone containers that have seven 2-oz sized cups to help with serving sizes...plus, they come in really fun colors. Beaba also has a travel bag, serving utensils and a cookbook. AH...I can't wait!
 
Now...I realize that I sound like a commercial for this product that I haven't even tried yet. But excuse me, I'm excited.

Monday, January 17, 2011

Baby Henry Nursery Kick-off

Chris and I are working on the nursery for Baby Girl Henry and WOW, it is a little overwhelming! There are so many important things we are trying to remember when creating this little room...

It needs to be functional...
It needs to be comfortable (for both baby and us)...
It needs to be safe...and...
It needs to be GORGEOUS!

So, we started with furniture. We have already purchased her crib and luckily, that was really the only thing we had to go out and find. We already have a shabby chic dresser (that will eventually be a changing table), armoire, nightstand and glider that are all ready for make-overs. Depending on space, we want to add a bookcase but we have to wait until all the necessities are placed first.

Next, we started thinking about colors. Right off the bus, we decided that neither of us can handle being surrounded by globs and globs of pink. We understand that many little girl nurseries are floor to ceiling pinks and although they can be gorgeous...we can't handle it. So, the search began for non-pink bedding. After much deliberation, we found it and it determined our color scheme...lime green, turquoise with touches of hot pink. Not traditional. Not expected. Not the norm. But we are LOVING it...so stuff it society!!!

As we search and purchase things, we are keeping her safety in mind. In other words, keeping everything as eco-chic as possible. Not everything is going to be organic or eco-friendly but the important things will be. We have to pick our battles, such as: researching safe house plants to assist with the air that she breathes (hint, hint...another post is brewing!), using paint that has no VOCs, using only furniture that is real wood (not particle board and free of those nasty, toxic glues), keeping plastic toys and gadgets to a minimum, opting for a slightly more expensive but extremely necessary eco-friendly mattress and mattress pad, and other fun tricks that as we learn them and learn from them...I will share!

To assist us in keeping ALL of this in mind while creating a GORGEOUS place for our bundle of joy, we created this little inspiration board:


As you can imagine, we have a ton of projects to start and finish before May...the clock is ticking! Creating the nursery is only a drop in our to-do-list bucket....so, I'll keep you updated!

Wednesday, January 12, 2011

Cupcakes for Puppies = Pupcakes!

So, I threw a birthday party for my puppy...please keep your eye rolls to a minimum! =) I knew this would be one of the last chances I had to truly spoil him with Baby Henry on the way so we went all out. We had a table of all his "Favorite Fuds", we invited all his puppy friends to romp in the backyard and I made "pupcakes". Which, were surprisingly easy and tasty....for the puppies...and humans! I found the recipe on Bake Space and only tweaked a little.  If you have a puppy friend, try this out:

2 ripe bananas
2 cups water
1 egg
1/2 tsp double strength vanilla
3 cups whole wheat flour
1 Tbsp baking powder
2 Tbsp honey
1/2 cup peanut butter

Preheat oven to 350 degrees (F). Spray cupcakes or mini cupcake pan with olive oil.

In a large bowl, mash bananas with a fork. Add all ingredients but peanut butter and mix until well combined. Add peanut butter and continue stirring until well blended.

If using mini cupcake pan, spoon 2 Tbsp (or 1/8 cup) batter into each well. If using regular cupcake pan, fill each well to the top. The batter will not rise or smooth out very much, so be sure to smooth it out and make it pretty.

Bake mini pupcakes for 15 minutes or until toothpick inserted in center comes out clean. Bake larger pupcakes for 25 minutes or until toothpick inserted in center comes out clean. Allow to cool for 3-5 minutes in pan before inverting onto cooling rack. Allow pupcakes to cool completely before feeding them to your dog.


They were such a hit! Most of the puppies ate them right up and a few of the humans did as well! They just tasted like bran muffins.

Here are some more pictures from Ollie's Birthday Bash:


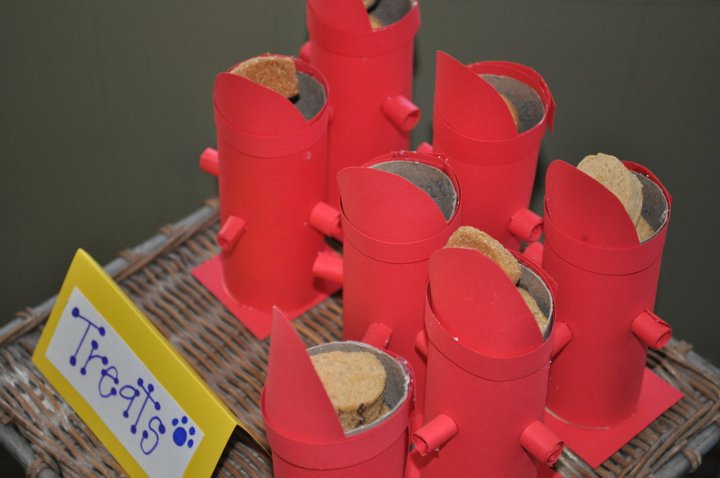
I made little favors for his puppy guests out of toilet paper rolls and paper!
It was super easy and a great way to recycle!

A happy...and full...birthday boy!

Thursday, January 6, 2011

South of the Border Lasagna

Last night, I had a meeting after work so I left dinner plans up to Chris. He is truly the master of our kitchen...yes, I admit it! When I came home, our house was full of yummy smells and I couldn't wait to dig in to his Mexican creation. He found a recipe at AllRecipes.com for a Burrito Pie. It had a few ingredients that weren't for us, so he tweaked it quite a bit and came up with this...


South of the Border Lasagna
1 onion, chopped
2 teaspoons minced garlic
1 (4 ounce) can diced green chili peppers
1 (10 ounce) can diced tomatoes with green chile peppers (Rotel)
1 (16 ounce) can refried beans
1 (16 ounce) can black beans
1 (16 ounce) can of Mexican Rice
12 (8 inch) flour tortillas
9 ounces shredded Colby cheese or favorite Mexican style blend

Preheat oven to 350 degrees F.  In a large skillet over medium heat, saute the onion and garlic for five minutes. Mix in the green chile peppers, tomatoes with green chile peppers, beans, and rice. Stir mixture thoroughly, reduce heat to low, and let simmer for 15 to 20 minutes.

Spread a thin layer of the bean mixture in the bottom of a 4 quart casserole dish. Cover with a layer of tortillas followed by more meat mixture, then a layer of cheese. Repeat tortilla, meat, cheese pattern until all the tortillas are used, topping off with a layer of meat mixture and cheese.

Bake for 20 to 30 minutes in the preheated oven, or until cheese is slightly brown and bubbly.


He served over a bed of chopped lettuce and with a dollup of sour cream (on his, I passed).


This was way tastier than I could have imagined! It wasn't too spicy or cheesy...perfect balance! Plus, he pointed out that all the ingredients cost about $15 and it actually baked enough for an entire family. It was cost efficient, easy, vegetarian, and yummy...all my favorite things!